Interesting mechanism inside the little brown Merz

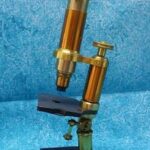
The Merz has an interesting design, and not one I have seen before. Most microscopes of this age and style have a solid round  bar through which a triangular bar passes. The triangular bar has a screw at one end and a spring at the other and it’s a very effective, simple fine focus mechanism.

The Merz has a rather different set up – it also has a triangular block with a screw at one end and a spring at the other, but instead of passing through a round bar, the triangular block passes through another triangular piece. The outer triangle is constructed from pieces of flat brass which have been joined together by brazing – this might explain why Merz painted these parts rather than lacquering them I think. Using brazed pieces of brass would have saved a lot of wastage and money and it would easily have been strong enough.

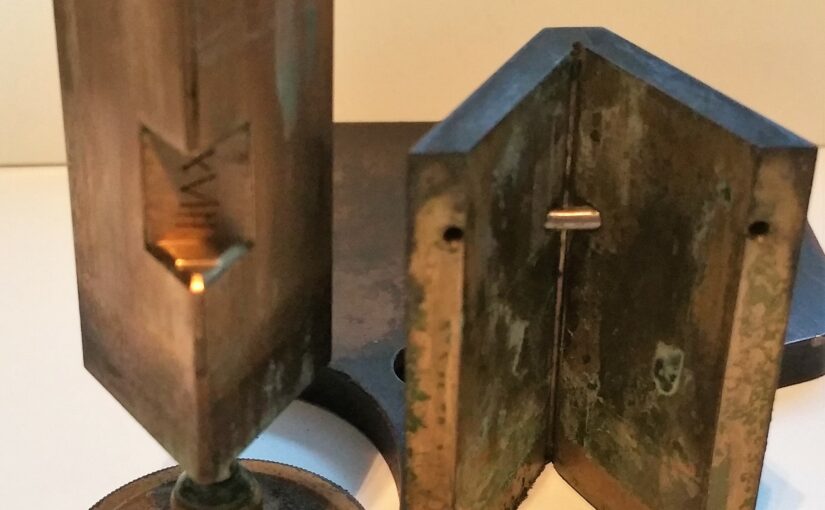
A “typical” round Baker fine focus block on the left, the Merz brazed, triangular fine focus mechanism on the right.

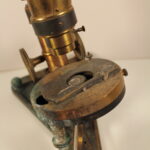
Travel could only have occurred in a small area. The solid triangular bar has a cut out area and a small bar is inserted through the corner of the brazed piece which acts as a stop. The pictures make it much easier to understand.


A microscope under the microscope

There are lots of pictures to look at today, I have been putting the little Merz under the microscope to check whether it was painted brown or whether it was chemically coloured and then lacquered.  I compared the brown foot of the Merz with chemically blackened areas on the Merz and with the paint and lacquer of a very old Reichert that I had to hand. I also looked at a microscope I lacquered myself to see how my lacquering compares to the masters! I used a trinocular Olympus SZ stereomicroscope and a Canon EOS 1100D

First, two pictures of the brown areas on the Merz. Click thumbnails to enlarge.

The picture of the left shows what a small scraping of the “paint” looks like. This scraping was made near the area of corrosion which will have to be replaced anyway. The picture on the right show some intact “paint”


It certainly looks like paint although it is an extremely thin layer. For comparison here are another two pictures. On the left, a chemically blackened area on the Merz, on the right the paint on the foot of a Reichert.

BELOW: The rather interesting pattern made in the “paint” by the corrosion is shown on the left,  in the centre is the lacquer on a lovely old reichert and on the right is some of my own lacquering. I’m pleased to say that the surface looks correct. the underlying metal on the piece I did is in worse shape but that is to be expected. It was heavily corroded when I got it. I wouldn’t have needed to lacquer it if it had been in the same condition as the Reichert.


I’m thinking that the microscope was painted, I can see brush marks in one area which also makes me think it was painted rather than chemically coloured/lacquered but it is quite hard to be sure. It could be that the chemical colouring has somehow soaked into the lacquer and coloured it. I may have to consult Henley’s 20th century recipes to check a few old methods of chemically colouring brass before I start doing anything drastic.

I wish I had a mass spectrometer.  I asked my husband, he said he’d put it on the shopping list and that as long as they have them in Tesco he’ll get me one.

Making paint

Pb or not Pb? that is the question. Pb is the chemical symbol for lead, today I shall be talking about lead. Hilarious aren’t I? ( please don’t answer that).

I have a new baby to work on.  You can see below that it has a patch of corrosion on the foot which has to be treated before if spreads. I shall treat it with a gentle rust remover, sand the area and prime before painting. Here’s the tricky bit – I like to use ingredients and techniques that are as authentic as possible. I am pretty sure that the original maker would have used a lead oxide primer. I can’t buy lead oxide primer and although I can buy lead oxide powder, it is very expensive and it’s not a clever thing to be working with. Also, the chances of me ingesting some are quite high, because I tend to lick things if I don’t have a damp cloth to hand.  I shall be using a commercially available non-ferrous metals primer instead, it won’t show underneath the paint anyway. Interestingly, I can see brush marks in the original paintwork so they weren’t being all that fussy.

20170807_150151

I shall be starting on it as soon as some brown paint pigments arrive from my chums at Ingilby. I need to mix my own paint for this one. For a bog standard black and chrome 1950s – 1970’s microscope I tend to use black enamel paint. either Japlac or a reasonably high temperature coach enamel, sometimes with lacquer on top, sometimes not. This baby is special, it is also much older than 1950 and painted brown not black.  Below is my paint mixing kit: pigments, linseed oil, a large ground glass sheet and a muller. Hopefully the brown pigments will arrive tomorrow.

20170807_145118

Here we go…

Here is the Baker microscope with the bent pinion all taken apart. Since taking the photo I have cleaned it, sanded some areas and primed them ready for painting. Tomorrow I shall blacken the stage and do some more sanding and painting. I shall repeat this process about 10 times. It will be worth it in the end.

disassembled Baker

Stage and paintwork

A customer has asked me to partially restore his microscope, a jug handled Baker. He has specified certain areas that he wants repaired as he wishes to conserve as much of the original paint as possible. He wants me to re-do several areas of the handle, an area on the foot, and the stage. The stage is a little stiff in one direction so the movement needs looking at too.

As you can see, I will also have to make a new pinion as the original pinion attached to the coarse focus is badly bent. Here’s the before photograph – let’s see what we can do! I’ll start by giving it a good clean as it is very dirty.