finished jug handled microscope

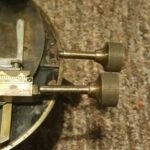
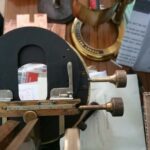
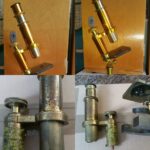
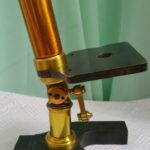
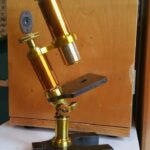
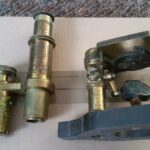
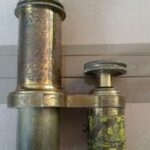
This lovely little Baker jug handled microscope came to me in need of repair. The coarse focus pinion was horribly bent and the mechanical stage was sticking. The paint on the handle and the chemically blackened stage were very worn and a small area of paint on the on the foot was badly chipped.

The pictures below show the microscope before and after repair. Paint work renewed, stage blackened, pinion straightened and stage “un-stuck.” Nothing was re-lacquered

Here we go…

Here is the Baker microscope with the bent pinion all taken apart. Since taking the photo I have cleaned it, sanded some areas and primed them ready for painting. Tomorrow I shall blacken the stage and do some more sanding and painting. I shall repeat this process about 10 times. It will be worth it in the end.

disassembled Baker

Stage and paintwork

A customer has asked me to partially restore his microscope, a jug handled Baker. He has specified certain areas that he wants repaired as he wishes to conserve as much of the original paint as possible. He wants me to re-do several areas of the handle, an area on the foot, and the stage. The stage is a little stiff in one direction so the movement needs looking at too.

As you can see, I will also have to make a new pinion as the original pinion attached to the coarse focus is badly bent. Here’s the before photograph – let’s see what we can do! I’ll start by giving it a good clean as it is very dirty.


Perfection! 

A small two tone Baker microscope appeared on eBay some years ago and I was quite taken with its beauty so when I happened across a very badly damaged Baker in need of re-lacquering I decided to recreate the two tone look.

This little chap has been something of an experimental piece as I have tested various brown and orange lacquers out on it. I am finally happy with it. I just have two small pieces drying and I can reassemble it properly. The slideshow below shows the microscope before and after restoration.

The lacquering line

Lacquer drying

Not something you see every day -my lacquering washing line. It’s important not to touch the lacquer after it is applied. It needs to dry for several days before being cooked. This re-purposed Ikea wardrobe makes a fine drying cupboard. The wardrobe doors are a good cat deterrent too. Nothing worse than cat hair in the lacquer. I wonder how Victorian microscope makers kept their cats at bay?

I use stiff flexible lubricant hosing and crocodile clips to hold the work while I lacquer it. Once lacquering is complete I can bend the hose and hang it up in the wardrobe. Wire also works but the piece being lacquered can sometimes flop around too much, also wire is not unsuitable for tiny pieces like screws.